Pages

Showing posts with label Fall. Show all posts

Monday, November 28, 2011

Turkey Cookies

These little cuties have become a fall tradition in my house. Great for snacking or for sharing with friends!

1 pkg. sugar cookie dough (or homemade) 
1 pkg. candy corn
Blue or green decorating gel
Orange decorating gel

Prepare sugar cookies per directions. Let cool completely.

Use blue or green gel to create eyes in the center of each cookie; use orange to draw on beak and legs. Using either color, draw on a double arch at the top of each cookie. Secure candy corns by pressing lightly into the gel (tip side down). 


Monday, November 21, 2011

Double-Layer Pumpkin Pie

This year I was looking for something new to spice up my Thanksgiving dessert menu. I loved the idea of having one less thing to bake, so this creamy, not too sweet pie was the perfect addition.

1 prepared graham cracker crust 
4 oz cream cheese, softened
1 T milk
1 T sugar
1 ½ cups Cool Whip
1 cup milk
2 (3.5 oz) packages instant vanilla pudding
1 (15 oz) can pumpkin puree
1 tsp cinnamon
½ tsp ginger
¼ tsp ground cloves

Place pie crust in the freezer to chill. Meanwhile, in a medium bowl, mix cream cheese, 1 T milk, and sugar until smooth. Gently stir in Cool Whip until completely combined. Spread mixture into the bottom of chilled crust. Return to the freezer for about 1 hour, until cream cheese mixture has hardened.

In a large bowl, whisk together milk and pudding mix. Stir in pumpkin, cinnamon, ginger, and cloves. When thickened, spread over cream cheese layer. Refrigerate 4 hours or until set.

*Modified from allrecipes.com


Thursday, November 10, 2011

Fun Fall Crafts for Kids

Great for younger kids, these crafts will keep the creative juices flowing this fall with everyday items, great for indoor projects.

30 Days of Thanks

 Take kids on a leaf hunt to find 2-4 nicely shaped leaves (or find templates online or in a craft store). Have children trace leaves on a variety of fall-colored construction paper and carefully cut them out.


Throughout November, have children write (or help them write) one thing they are thankful for on a leaf. Hang the leaves as a display for children to be proud of.


Bird Feeder

 Save a collection of toilet paper rolls. Spread each tube with creamy peanut butter. Pour a cup of bird seed on a plate and have children roll the tube to cover completely.


Slide tube onto a tree branch and watch the birdies feast.


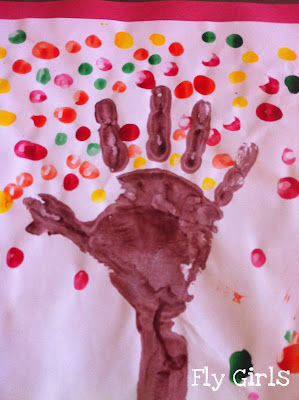
Fingerprint Fall Tree

 Help children paint hand and wrist with brown paint. Press handprint onto plain, white paper. Dip fingertips into fall-colored paint and press onto tree “branches” (fingers) to create leaves. Mount on construction paper for a matted look.


Apple Mosaic

 Have children tear a piece of yellow or red construction paper into small pieces. Trace and cut out the shape of a large apple on cardstock. Let kids arrange paper bits around the apple surface until completely covered; glue to secure. Tear off a rectangular piece of green or brown paper for a stem.


Thankful Tree

 At a local craft store, buy preformed foam tree and sticky leaves or foam sheets to create your own. Have children construct tree. On each leaf, have kids write something they are thankful for. Stick leaves on tree branches for display. 


Thursday, October 27, 2011

Cajun Pumpkin Seeds

There are two main things I love about pumpkin carving: 1) Digging the goop out of the inside (I don’t know why I take such perverse pleasure in this! I’m like a little kid playing in the mud); and 2) Eating yummy pumpkin seeds. This year, I tried something new for the seasoning on my seeds and it was a hit! The seeds had just the right amount of flavor and crunch.

2 cups pumpkin seeds (I used the seeds from two medium-sized pumpkins) 
3 T butter, melted
1 tsp Cajun seasoning
¼ tsp garlic powder
2 tsp Worcestershire sauce

Combine all ingredients in a medium bowl, stirring well to coat; pour out evenly onto a lightly sprayed baking sheet. Bake at 300 degrees for 30 minutes, stirring every 5 minutes. Reduce heat to 275 degrees and cook 30 minutes more, continuing to stir. Let cool before serving. 


Monday, October 10, 2011

Apple Cake

Apples are among my favorites of the fall harvest. My mom’s apple cake has been a family treat for as long as I can remember and so tasty, I often prefer it in lieu of a more traditional birthday cake!

2 eggs 
1 cup canola oil
2 cups sugar
2 ½ cups self-rising flour
3 cups apples, chopped and peeled (about 3-4 apples)
½ cup pecans, finely chopped
1 package butterscotch chips

Preheat oven to 325 degrees.
In a large bowl, combine eggs, oil, and sugar; add flour and stir well to combine. Stir in apples. (Hint: This takes some elbow grease, as the dough will be very dense) Pour and spread mixture into lightly greased 9x13 pan. Sprinkle pecans and butterscotch over the top. Bake 55-60 minutes, until golden brown and cooked through. Best served warm.


Thursday, September 22, 2011

Yarn Wreath

I’m just now starting to explore my craftier side thanks to my crafty friends and Pinterest. This yarn wreath was simple enough not to be intimidating and makes a beautiful embellishment for any season.


You’ll need: a foam wreath base, yarn (I used multi-color yarn), a hot glue gun, and embellishments. You may also want twine or ribbon to hang your wreath, though additional yarn would work just fine. I found all of my supplies at Hobby Lobby.


 To begin, use hot glue to secure the beginning of the yarn and begin wrapping around the wreath, pushing the yarn close together so that you can no longer see the white base.


 Keep wrapping. (Hint: If you decide not to complete your yarn wrapping in one sitting – I recommend breaks!– when you come to a stopping point, simply snip the yarn and glue it down. Then restart by gluing the end where you left off. This prevents unraveling.)


When the yarn completely covers the wreath base, securely glue down the end.


Play with the embellishments to decide on a layout; then use hot glue to secure to the wreath.


Allow your wreath to dry and hang with extra yarn, twine, or ribbon. 


Monday, September 19, 2011

Pumpkin Pie Muffins

My favorite part of fall? The return of pumpkin! This was another Pinterest-inspired recipe, based on the simplicity of two main ingredients. (No eggs, no oil – just pumpkin!)

1 box yellow cake mix 
1 can (15-oz) pumpkin
½ tsp. pumpkin pie spice
Powdered sugar for dusting (optional)

In a medium bowl, mix all ingredients with an electric mixer on medium speed, 2 minutes, until well combined. Divide batter among 18 greased muffin cups. (Tip: Try using an ice cream scoop to measure out the batter.) Bake at 350 degrees for 20-25 minutes. Dust muffins with powdered sugar.

( Emily’s tip: Try adding milk or white chocolate chips to the batter!)

*Recipe modified from Sweet Verbena


Wednesday, September 14, 2011

Fall Fabric Wreath

Are you ready to JUMP into Fall? I sure am! Yesterday, it was around 100 degrees here. Tomorrow, we are going to be hit with a massive cold front. It's going to be a high of 57 degrees! That's a huge drop in temperature, but I am sure ready for Fall weather and everything Fall, including Fall decorations inside my house. It's hard pulling out all the decorations when I know that I will be needing to pack them up soon since we are moving. But, I am just not sure I can go the whole season without getting in the spirit. On Monday evening, Fall made its first appearance in our house with my new, fun, and festival Fall wreath.


Supplies:
1 foam wreath
5 different fabrics cut into 2 1/2 inch by 18-19inch strips
Coordinating ribbon (optional)

Steps: Lay fabric underneath wreath, one piece at a time. Fold side of fabric under so that raw edges will be tucked toward inside. Tie, then double-knot fabric onto wreath. Move knot to outside edge of wreath. Continue until entire wreath is covered with fabric, alternating colors as you go. Hang using ribbon.


Friday, August 26, 2011

Fall Printable

Since I am originally from MD, where the temperature actually changes four times a year, I have grown to really love Fall. The weather is perfect, the colors are pretty, the food is yummy and there are so many activities to do. Now that I live in South Texas, I fear that Fall is just not going to be the same. I am pretty sure the average temperature in South Texas is still in the 80's for October. Hopefully I will be able to get in some jeans and boots days before then!

I came across a tutorial from Centsational Girl on how to create word art in Picnik and Picasa.  The tutorial is simple and very easy to follow.  All I did was find a photo image of the background I wanted online and then I edited the background with Picnik.  There are hundreds of possibilities on what you can do but for my first attempt I was pretty pleased. 


You should just be able to click the image to open it into a new window and then print an 8x10.